The Good, the Bad and the DIY
Putting up an aerial has to be pretty easy, right? Just get an aerial from the DIY shop, screw it to the house and point it the same way as the neighbour’s, wire it up and you’re in business.
Oh, really? Let’s take one example. It was put up by the previous occupant of the property, who was certainly a competent DIYer. But his effort goes to show that it can be the details that make or break an installation.
Take the aerial, for instance. The one he bought was – how shall I put it? – at least two sizes too large. You just don’t need such a big aerial round here. The DIY sheds like to sell these large aerials. It helps amateurs to get a good signal even if their aim is a bit off, and of course the higher price means higher profits. The downside? Well, there is such a thing as too strong a signal. If you overload the input stages of your television or set-top box, it causes all sorts of problems with signal distortion. And then you need a bigger bracket and stronger mast – all more expense for you. Unless, as did my neighbour, you get ones that aren’t strong enough for the aerial.
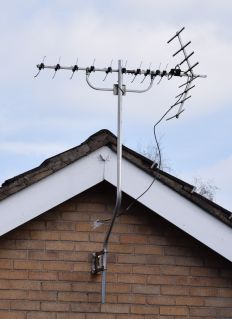
Then there’s where to put it. My neighbour started by screwing it into the bargeboard above where you see it in the photo. When I saw what he’d done, I tried to warn him that it should be mounted on the wall, but he remained confident that the wood was strong enough. Unfortunately, I was proved right during the first strong autumn storm. It blew down and he had to relocate the bracket to the wall. It is easy to underestimate the wind loading of an aerial like this. It looks as if it consists of just a few thin tubes and it doesn’t weigh a huge amount. But in a 75 mph wind it will exert a force of well over 6kg in addition to its own weight. If it comes crashing down, there is a risk of damage to the roof as well as the expensive aerial, and if it is over a pathway, could cause injury to anyone underneath at the time. Fortunately in this case the worst that happened was the aerial needed a bit of bending back into shape.
The bracket is too small for this weight and the length of the mast. As the mast acts as a lever, the force applied to the bracket is considerable, and in any wind we see it rocking backwards and forwards like one of those Churchill dogs in a car window and makes a noise. That action can eventually work the brick loose. So this bit of DIY cost saving could have expensive consequences.
The photo also shows other mistakes. The mast projects through the aerial, which can affect its performance. The cable was cut too short to secure properly and is now flapping in the breeze, which will eventually break the inner conductor. And there is no drip loop where it enters the wall, so if the flapping breaks the seal, rainwater will run down the cable and into the hole.This is far from being the worst DIY installation I have ever seen, and to be fair, the TV pictures are fine. There are far more amusing examples at Wright’s Aerials and ATV.
You might expect me to recommend using a professional fitter. And so I do. It isn’t what you know you don’t know that gets you, but what you don’t know you don’t know. And the consequences of mistakes may not only be expensive but even dangerous. Not only can you place yourself at risk by climbing ladders and working on the roof without the safety equipment the professionals will use – remember that even a fall of 2m can kill you, and 24 people a year in the UK die from falls when working at height – but you may also place the public or members of your family in danger from a falling aerial and its heavy bracket. You might think you are saving money, but that isn’t necessarily the case. If you already have one aerial you may not need another if all you want is one extra TV point. Or it may be time to change that old aerial. A professional will be able to advise you.
|
|
|
|


